
 Share This Page
| Home | | Computer Graphics | |  |  Share This Page Share This Page |
Designing optical elements in the Blender graphics workshop
— P. Lutus — Message Page —
Copyright © 2019, P. Lutus
Most recent update:
(double-click any word to see its definition)
Blender is the name of a terrific, free, open-source graphics workshop. It's also an example where things have gone right in the open-source community — people wanted a first-rate tool, they were willing to cooperate to get there, and Blender is the result.
Blender helps you create computer graphic images and videos. It includes modeling and visualizing tools to assist you in setting up images and sequences of images. Then, at your command, it generates the images and videos you designed.
In years past I've used more complex and difficult-to-use graphics tools like POV-Ray, programs that (unlike Blender) don't have a user interface and whose use is more like computer programming — click here to visit one of my POV-Ray projects.
At the time of writing Blender has released a new version (2.80) that overhauls the user interface and makes Blender easier to use. This has many advantages and a few drawbacks. The advantages are that this increasingly complex program acts more intuitively and consistent with people's expectations based on their experience with other programs. One drawback is that a lot of older contributed code and instructional methods no longer work.
In this article I explain how Blender differs from other graphics programs. I show some of its strengths and weaknesses, and I provide methods to achieve some interesting optical effects. This article is also intended to be a resource for a series of future YouTube videos I'll be creating on the topic of Blender — both tutorial and techniques.
Before we get started, let's take a look at Blender's user interface (Blender 2.80):
- The 3D Viewport is a sort of visual workshop, where you can add and remove things from your scene.
- The Outliner is a hierarchical diagram of your project that shows the relationship between elements of a scene.
- The Properties Editor gives you access to many kinds of controls, for display, animation, appearance of objects, and much more.
- The Timeline can be expanded and shows video sequencing and animation controls. It allows you to configure motions and property changes over time.
Some additional notes:
- The Blender user interface is very customizable, some might say to a fault, so back up your work regularly to be able to recover from an error.
- This project has several stages, each of which builds on what came before, so saving your work has particular significance, in particular because you can save a project file under a new name to preserve additions and changes.
- Remember that you can undo an action with keyboard shortcut Ctrl+Z, and "re-do" an "undo" with Shift+Ctrl+Z.
If things get confusing later on, refer back to this diagram for an overview.
Let's get started!
It's important to explain what may seem to be a rather technical point, but it's important to understand. When POV-Ray (Figure 1) and many other programs want to draw, say, a sphere, they shoot rays out into a mathematical landscape and, using pure mathematics, find points of intersection between the modeled light rays and the object. A sphere, a cube, or any more complex object must have an associated mathematical equation to describe it, so computer ray-tracing methods can find and process it.
Blender uses a different method — it relies on polygons. If Blender wants to show a sphere, it constructs one out of many little polygons — squares, triangles, etc..
At risk of oversimplifying this topic, here's one way Blender and POV-Ray differ (play the videos):
Figure 3: POV-Ray traces light rays wherever they go
This is something Blender can't do — it can't show full light paths, such as the path light may take exiting from a lens, some cases of light shining through windows and other glass objects, and similar circumstances.
Click here to download the POV-Ray source script.
Figure 4: Blender draws polygons
I chose this example to dramatize an important difference between Blender and other renderers (Blender relies entirely on polygon rendering). This is not to disparage Blender, which is much more than a simple image renderer.
Click here to download the Blender source file.
Notice the optical lenses in Figures 1 and 3? I'll be covering the topic of lenses and optics in greater depth below.
Here's another comparison to show the difference between Blender and other renderers:
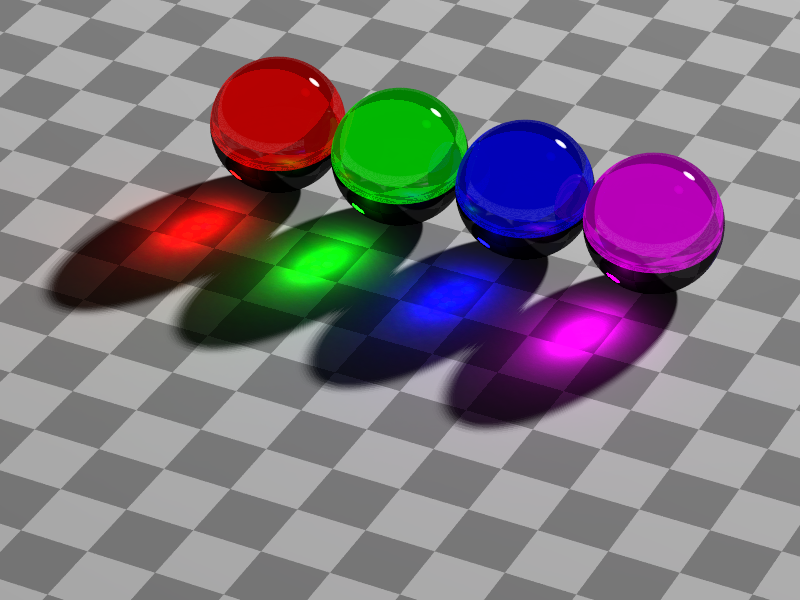
Figure 5: POV-Ray optical path resolution
POV-Ray and other pure ray-tracing programs render optical paths as shown. Notice how the light passes through the glass spheres then converges to a focus, just like in reality.
Click here to download the POV-Ray source script.
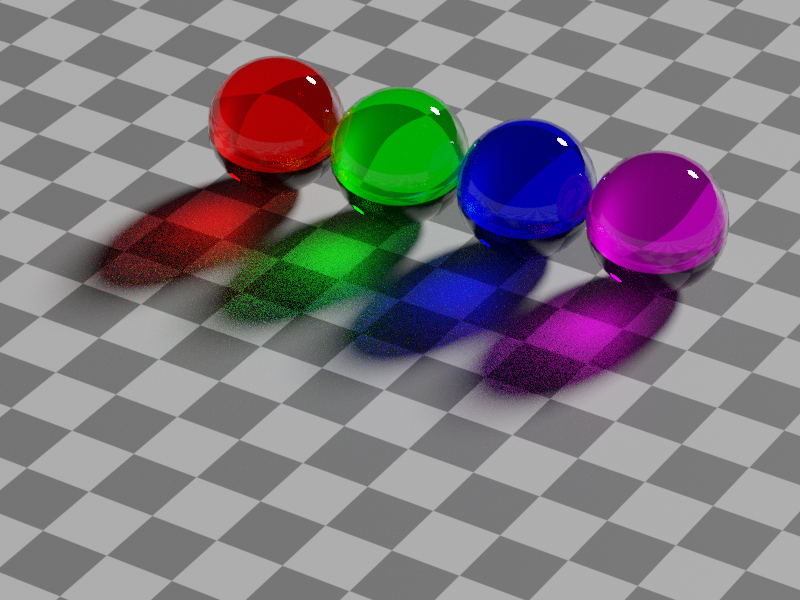
Figure 6: Blender optical path resolution
Note the difference in the light focal points (this is a Cycles renderer example). This means Blender can only approximate the appearance of optical paths.
Click here to download the Blender source file that created this scene.
Again, these issues are important to understand, but they shouldn't be seen as disparagement, because Blender can do many things that POV-Ray (as one example) cannot do. Blender's sophisticated user environment, interactivity and quick feedback greatly improve the experience of creating graphics and videos.
Also, because of its great value to the open-source and creative community, Blender will eventually be rewritten to allow pure ray-tracing to mathematical objects (as with POV-Ray), and polygon rendering will remain a fall-back for people in a hurry.
I'm planning to create this tutorial as a video, but for the moment, here are step-by-step instructions (Blender 2.80 or newer).
- Run Blender with no specified .blend file (Or use File ... New to achieve this state).
- In the 3D Viewport (Figire 2), erase the default cube object: click it, then press the Delete keyboard key.
- Select menu item "Add" or press Shift+A to access the object menu.
- Navigate to Mesh -> UV Sphere and select it.
- Select the camera in the Outliner (Figure 2, upper right) then, using the Properties editor at the lower right, set the camera to location (0,-5,0) (meaning X=0,Y=-5,Z=0) and rotation (90,0,0). Switch to the camera view (click the camera symbol at the upper right or Numpad 0).
- Select the light in the Outliner, then with the Properties editor, choose "Sun" mode, strength 3, and set the light's rotation as (-60,0,120). In "Sun" mode the light's location doesn't matter, only its rotation setting.
- Now you should see this:

Figure 7: Unmodified UV Sphere
- Now left-click the sphere (it will then show an orange outline), then right-click to access the context menu (a recent Blender addition!) and select "Shade Smooth."
- Now you should see this:
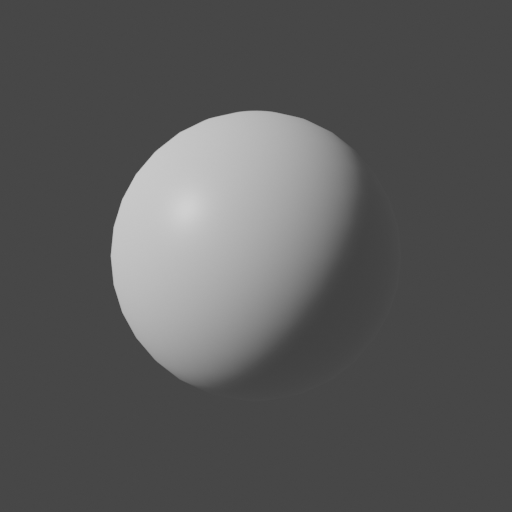
Figure 8: "Shade Smooth" UV Sphere
- Digression: Remember earlier we talked about Blender and polygons? The "Shade Smooth" feature is a clever way to avoid one of the less desirable aspects of a round object constructed from flat polygons. "Shade Smooth" applies a mathematical operation to make the sphere seem more ... well, spherical ... than it actually is. This and other similar Blender features greatly reduce the problems created by constructing everything from polygons.
Now let's make the sphere transparent, like a glass ball, and explore its optical properties.
- Click here to open/close a subwindow that explains how to make a Blender object transparent and show optical refraction.
- Having enabled transparency and refraction, you should see this:
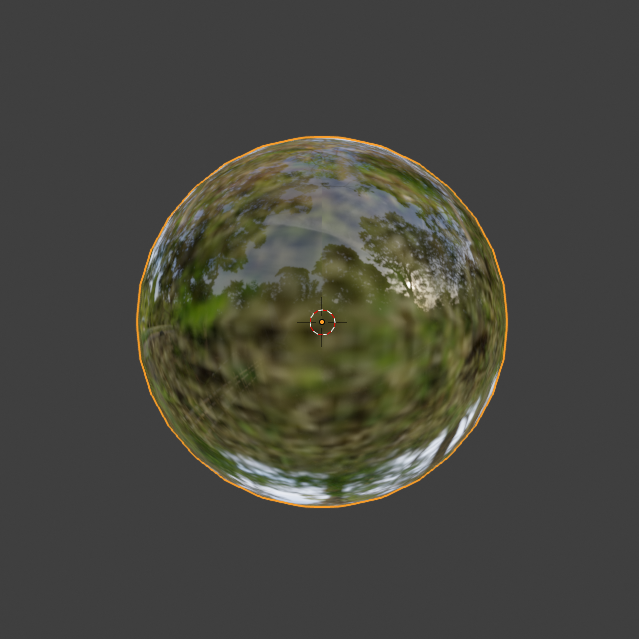
Figure 9: Transparent UV Sphere
Now we have a transparent sphere that may show some of the optical properties of a real glass object. Let's see.
- To test the sphere's optical properties, we need a suitable background image that will serve as a backdrop for the transparent sphere.
- Ideally, the background image should fill all the space around the sphere, with familiar objects we can use to evaluate the properties of the glass. For this we need a special kind of graphic called "equirectangular", specially designed to wrap around a spherical space (like Blender's little universe) and provide a realistic background.
- You have a number of options to get an equirectangular graphic. You can visit Flickr's equirectangular collection, or PhotoPin's similar collection. Many of these images are very good quality and free for personal use.
- You can also use my personal test image that I created with a cell phone, even though it's not nearly as good as many others online. Here it is:
Having acquired an equirectangular background image, we need to put it in the Blender universe.
- First, let's replace the Blender world background with our image.
- In Blender's default display, locate the Properties editor at the right in the default layout. Click the highest red globe tab with the flyout text "Context: World".
- In the dialog that appears, locate the "color" control. Notice that it has a small circle to its right (that unfortunately has no flyout text to reveal its purpose). Clicking the little circle opens a submenu of choices.
- From this submenu, select "Environment Texture." This will replace the "Color" control with one that includes a file folder that lets you choose a background image.
- Open the file control, navigate to the location of your chosen background image and select it.
- To make this world environment appear in the layout 3D view, locate a little down-arrow at the upper right, click it, and check two options: "Scene Lights" and "Scene World". The desired setting should look like this:
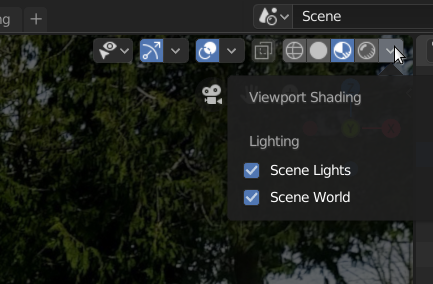
Figure 11: Setting "Scene Lights" and "Scene World"
- This configuration change should replace any pre-existing background with the image you chose for a background, and you should see something like this (with my background image linked above):
Here's a video animation of the resulting scene. It's consistent with what one would see with a real glass sphere in the same circumstances (click to start/stop the video):
Figure 13: Animated transparent glass globe (click to start/stop)
- Click here to download the Blender file that created the above animation. The Blender file will work on your system in all respects except that it needs to be directed to a local equirectangular background image, which you need to specify on your system (see above).
- In this tutorial we discovered that Blender can create realistic optical glass simulations, even though it builds everything from polygons (a natural handicap).
Remember Figure 3 above, the lens that showed a changing focal point? Blender can't do exactly that, but it can show lens properties if the viewpoint is through the lens. Let's start by creating a double-convex spherical lens like that shown in Figure 3.
First, a basic idea about lenses — a common spherical lens can be mathematically analyzed as the intersection of two overlapping spheres (more on this topic in the advanced section below):
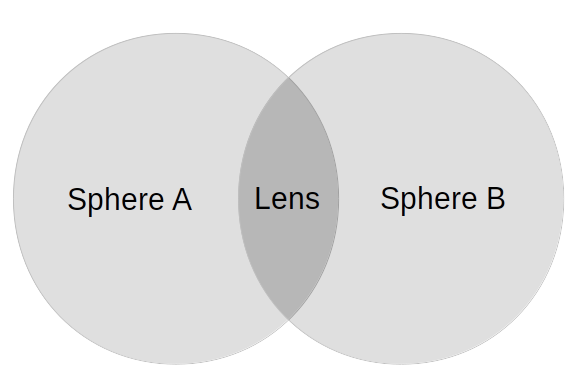
Figure 14: Analysis of a spherical Lens
My plan in this tutorial is to show how to use two spheres and a little-known Blender feature called "Boolean Operators" to isolate the volume shared by the two spheres, thus creating a spherical lens. This way of designing a lens has the great advantage of building in virtual space an object we otherwise could only imagine. Here we go:
- As before, start with an empty project, delete the default cube.
- Before we go on, I want to mention an important shortcut key: Ctrl+Z, which (wait for it...) undoes the most recent operation. Repeatedly pressing Ctrl+Z undoes repeated operations. And better, to restore an operation you've inadvertently undone (to "re-do" it), press Shift+Ctrl+Z.
- One more digression — as you carry out this project, you will want to save your work. Choose File ... Save As, name your Blender project and put it somewhere safe. Then, as you work, periodically press keyboard Ctrl+S to save the current state of your project.
- In the layout 3D view, use the viewpoint position controls at the upper right to position the viewpoint along the Y axis, showing the label "Front Orthographic".
- As we did in the above project, create a UV sphere (Shift+A ... Mesh ... UV Sphere).
- Make a copy of this sphere using Ctrl+C (Copy) then Ctrl+V (paste). The copy will be in the same position as the original.
- Select the visible sphere (so it's surrounded by an orange circle) and go to the position tab in the properties editor. Move this sphere to position (0,0,.707106).
- A word of explanation — the number ".707106" is a special value that needs to be entered just as shown to produce the best lens (more explanation below, but for now it's $\frac{1}{\sqrt(2)}$).
- Select the other sphere (which should now be visible) and move it to (0,0,-.707106), in other words, the same offset in the other direction. You should now see this:
- In the properties editor, select the "Modifiers" tab (wrench symbol) and choose "Add Modifier" ... "Boolean".
- There are three Boolean operators: Intersect, Union and Difference:
- Intersect yields only those parts of the original objects that overlap, that have a shared internal volume.
- Union joins all the objects into a single new object.
- Difference yields only those parts of the original objects that were not overlapping — it's the opposite of Intersect.
- Because we want the overlapping parts of the two spheres, select the Intersect operator.
- At this point the Boolean operator needs to know which is the second object for the pending operation. You can either select the other sphere from the provided drop-down list, or click the eyedropper symbol, then select the other sphere by clicking it.
- One of the two spheres will disappear, indicating that the operation is about to be carried out, but to confirm the outcome, you must press "Apply," otherwise the Boolean operator feature will undo what it's done.
- After this operation, one of the two spheres will remain — select and delete it with the "Delete" key.
- The unfinished lens will now be on display:
- Now several minor actions need to be taken:
- Select the lens, right-click, choose "Shade Smooth."
- Notice in Figure 16 there's an orange dot near the bottom of the display — that's the current origin for the lens, mislocated because of how the lens was created. We need to move this origin to the middle of the lens — right-click, then choose "Set Origin" ... "Origin to Center of Mass (Surface)".
- Rotate the lens 90 degrees in the X axis so it's upright (Rotation: (90,0,0)).
Press Shift+S and choose "Selection to Cursor."Rename the lens — it's likely named "Sphere" at the moment. Double-click the name (upper right) and change it to something more useful like "Lens". Now we need to create a target to test the lens:
- Temporarily make the lens disappear — select the lens, move to the upper right where it's listed and click the little eye symbol next to it. Remember that you did this, it will need to be reversed later on.
- Download this sample target file and store it anywhere convenient — this will be the optical target content.
- Now, to create a target object, choose Add (Shift+A) ... Mesh ... Plane.
- Select the newly created plane (click "Plane" at the upper right, because the plane won't necessarily be visible yet in the 3D view) and in the Properties editor, select the orange square tab (Context: Object), rotate the plane 90 degrees in the X axis (Rotation: (90,0,0)), move it +2 meters along the Y axis (Location: (0,2,0)) and scale it as a rectangle (Scale: (1,.5,1)).
- Now let's provide the text content for our target:
- In the Properties editor select the lower of the two red spheres (Context: Material). The pane will initially have a "New" button on display — press it.
- The properties editor will now show the options for a "Principled BSDF" material. Locate the property "Base Color" and notice the little circle to its right:
- Click the little circle seen in Figure 18 and select "Image Texture" from the list that will appear.
- Now "Base Color" will have "Image Texture" to its right and a file folder symbol below it. Click the folder, navigate to the sample target file downloaded above and select it.
- At the upper right, the text target we're just constructed will have an initial identifier of "Plane." Double click this and rename it "Text Target".
- Now you should see something like this:
Now we can reintroduce the lens:
- Select the lens and restore its visibility (upper right, eye symbol).
- The lens is still opaque, no light can get through — it needs to be made transparent.
- Click here to open/close a subwindow that again explains how to make a Blender object transparent and show optical refraction.
- You should now see this:
- Click here to download the Blender file that creates this scene. When you load this file into Blender, to work as intended it will need to be directed to a local copy of this text image.
Explore this virtual optical system:
- Select and move the lens and/or the text target, notice that the image in the lens changes size.
- It's important to say that the Eevee render engine only approximates true refraction (bending) of light rays.
- To solve this problem and if your computer is fast enough, try changing from the Eevee render engine to Cycles (Properties editor, Context: Render, Render Engine: Cycles).
- You will soon discover that, in exchange for rendering noticeably more slowly on any but the fastest machines, the Cycles render engine does a much better job rendering optical paths and refraction, in particular with respect to true focal length and other properties of lenses.
- This and related issues are discussed next.
This section goes more deeply into optical lens and mirror design, which may not be the reader's primary interest, but it may be worth reading because it shows how to create and import Blender meshes representing arbitrary mathematical functions, as well as show how to write Python code to automate creation of complex and accurate Blender objects.
Let me start by introducing my Python mesh generator, which works in concert with Blender to generate and import high-quality spherical and hyperbolic lenses and various kinds of mirrors, all having closely controlled user-defined shapes.
- The Python program mesh_generator.py (click the link) is normally run from the command line alongside Blender this way:
$ blender [optional .blend file] -P mesh_generator.py -- [optional mesh_generator commands]- Don't leave out the "--" shown above, which Blender needs to be able to distinguish its own commands from those meant for the Python script.
- Without any included options as shown here,
mesh_generator.pygenerates a default hyperbolic lens, results from which are presented below.- This GPL, open-source Python script can be repurposed as a template for many other kinds of desired mathematical mesh profiles — it's worth close examination for its suitability to other tasks.
- Click here to open/close a window that lists the Python program's command-line options.
Spherical versus Hyperbolic Lenses
Spherical lenses are very easy to make, but their advantages end there. If the purpose is to focus many parallel light beams to a point, a spherical lens isn't a very good choice. Here's a comparison between spherical and hyperbolic light paths (images generated with OpticalRayTracer):
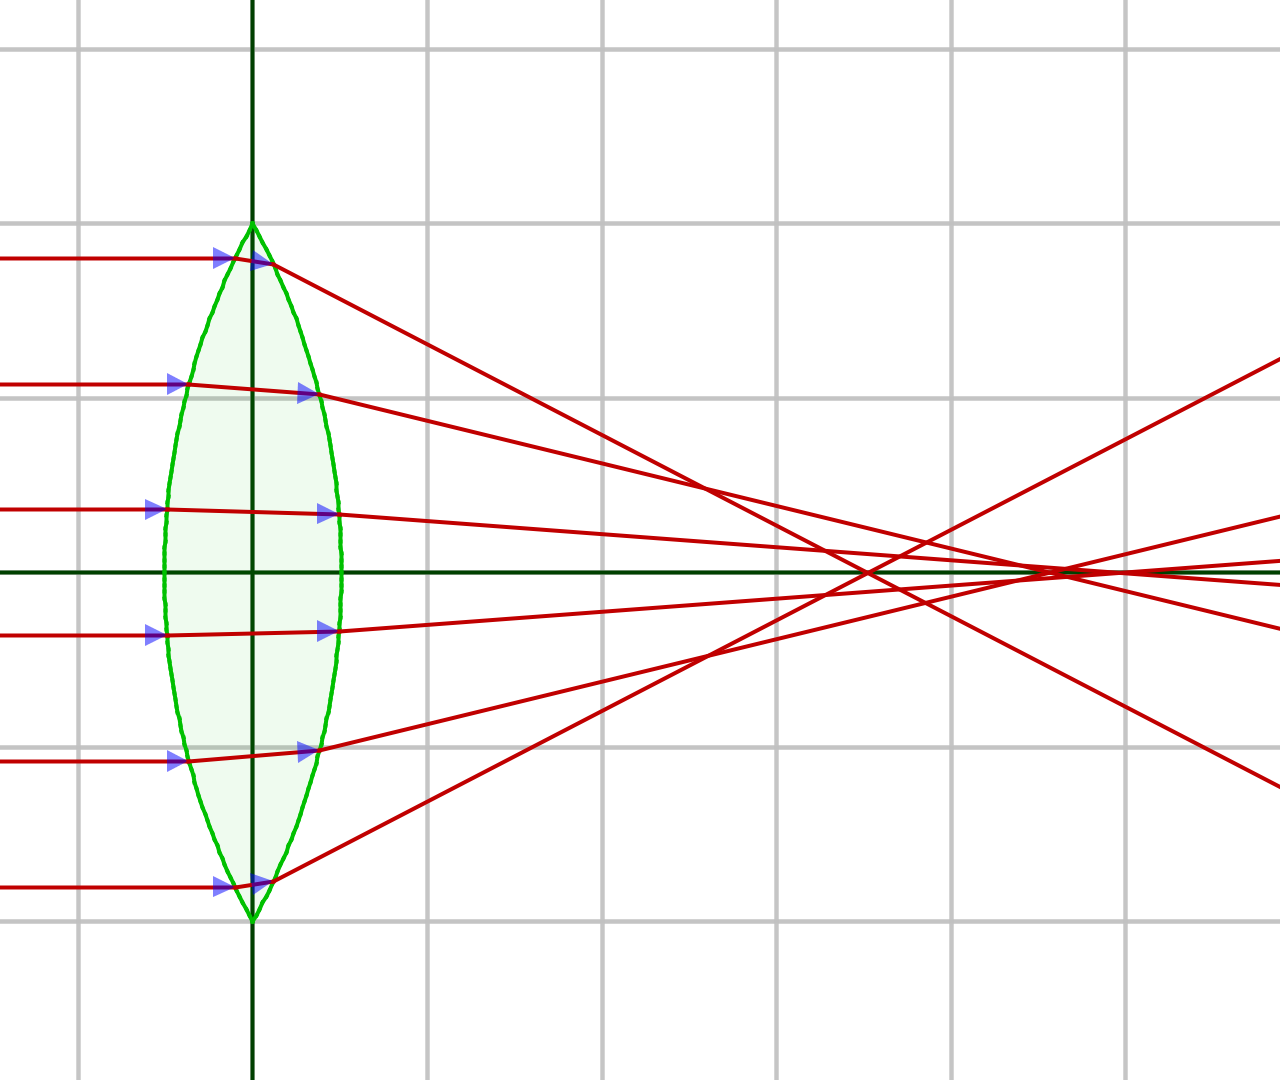
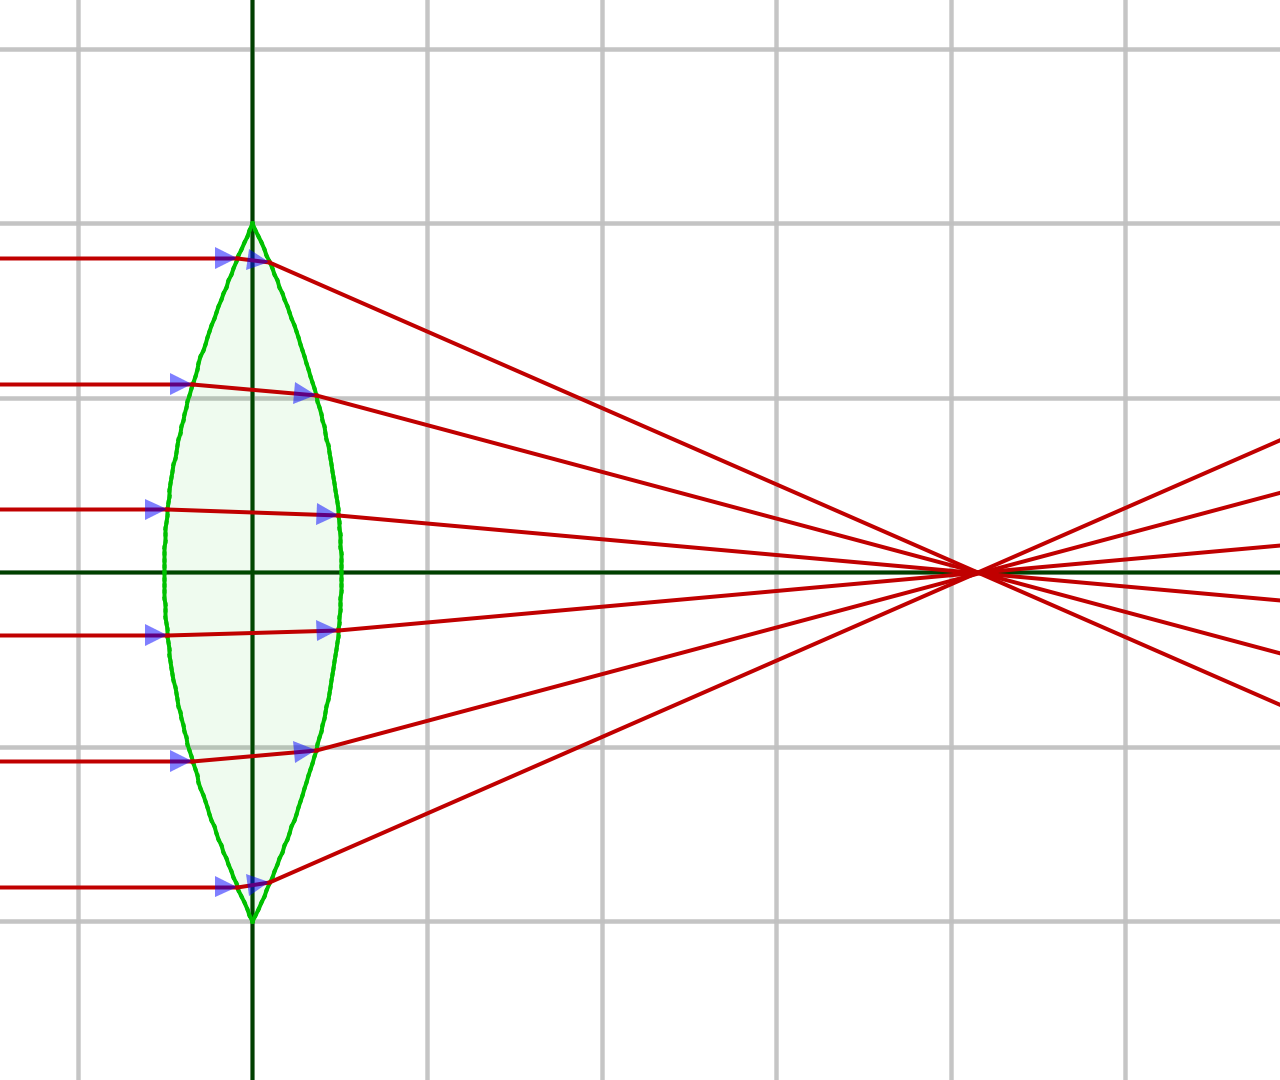
Figure 21: Spherical Lens Profile (click for full-size)
Figure 22: Hyperbolic Lens Profile (click for full-size)
This defect in spherical lenses is less serious with long focal lengths, but for the many applications for short focal length lenses (telescope eyepieces, microscope objectives, most camera lenses, especially those found in cell phones) the problems created by spherical lenses are unacceptable.
Here's a somewhat more dramatic comparison between spherical and hyperbolic lens profiles — compare the light paths in these videos (generated with POV-Ray only because Blender can't do this trick):
Figure 23: Spherical lens profile (POV-Ray)
Click here to download the POV-Ray source script.
Figure 24: Hyperbolic lens profile (POV-Ray)
Click here to download the POV-Ray source script.
Here's a chart showing the curves for spherical, parabolic (telescope mirrors) and hyperbolic lens profiles:
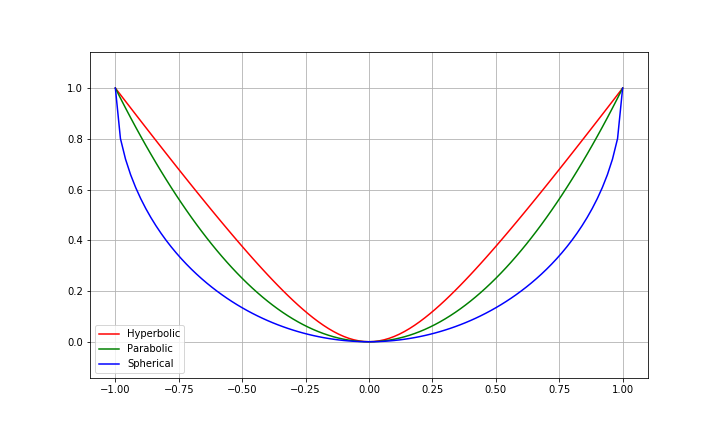
Figure 25: Comparing lens profiles
These plotted curves are exaggerated compared to their typical shapes in practice, but with regard to the optical results, a subtle difference in lens shape creates a large change in outcome.
Play these videos that dynamically compare Blender-modeled spherical and hyperbolic lenses (the lenses were created with my Python script mesh_generator.py, introduced earlier, and were rendered using Blender's "Cycles" rendering engine):
Figure 26: Spherical lens dynamic profile (Blender)
Figure 27: Hyperbolic lens dynamic profile (Blender)
Click here to download the Blender source script (also this target graphic).
The point of the above comparison is to show that different parts of a spherical lens have different focal lengths, but a properly designed hyperbolic lens has the same focal length across its entire diameter.
This video comparison makes several points:
- A short focal length spherical lens is often much worse in practice than in theory.
- There's nothing like an optical side-by-side comparison to see the benefits of certain design choices.
- The Blender "Cycles" rendering engine is accurate enough to support these kinds of tests (not true for "Eevee").
- Modeling optical elements in Blender can be a useful activity in advance of creating physical prototypes.
Behind the scenes of all that appears above, for both Blender and general lens design, is a rich mathematical landscape I think may be worth learning.
Snell's Law
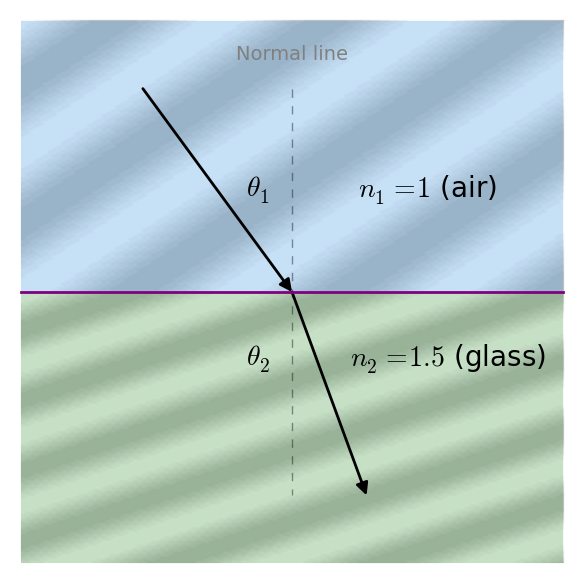
Figure 28: Snell's Law and optical refraction
First, let's look at the foundation on which all optics is built — Snell's Law, which results from the physics idea that light moves more slowly in glass than in air. Snell's law:
\begin{equation} \frac{\sin \phi_2}{\sin \phi_1} = \frac{v_2}{v_1} = \frac{n_1}{n_2} \end{equation}Where:
The indices of refraction $n_1,n_2$ are related to the velocities $v_1,v_2$ and can be acquired from them. For a given velocity $v$: \begin{equation} n = \frac{c}{v} \end{equation}
- $\theta_1, \theta_2$ = angles (directions) taken by light waves.
- $v_1, v_2$ = light velocities in the respective media.
- $n_1, n_2$ = Unitless indices of refraction (IOR) in the respective media.
Where $c$ = speed of light (299792458 m/s). Therefore as $v$ declines, $n$ becomes larger ($n$ is proportional to time delay). Here's an example — a typical measurement for $v$ in glass is 199861639 m/s. The index of refraction $n$ for this particular kind of glass is therefore:
\begin{equation} n = \frac{c}{v} = \frac{299792458}{199861639} = 1.5 \end{equation}Equation (3) tells us that light requires 50% more time to pass through this specific glass.
Using Equation (1) as our basis and setting aside $v_1,v_2$, which are of little interest in optical work, here are the four equation forms by which useful results may be acquired:
\begin{equation} \theta_{1} = \sin^{-1}{\left (\frac{n_{2}}{n_{1}} \sin{\left (\theta_{2} \right )} \right )} \end{equation} \begin{equation} \theta_{2} = \sin^{-1}{\left (\frac{n_{1}}{n_{2}} \sin{\left (\theta_{1} \right )} \right )} \end{equation} \begin{equation} n_{1} = \frac{n_{2} \sin{\left (\theta_{2} \right )}}{\sin{\left (\theta_{1} \right )}} \end{equation} \begin{equation} n_{2} = \frac{n_{1} \sin{\left (\theta_{1} \right )}}{\sin{\left (\theta_{2} \right )}} \end{equation}Mathematical Modeling of Lenses
My optical analysis tool OpticalRayTracer relies on Snell's Law as well as a number of geometric equations that describe lenses and mirrors.
In this section I'll show the mathematics for a simple lens. Here's a diagram of a spherical lens that can have a separate curvature on each side:
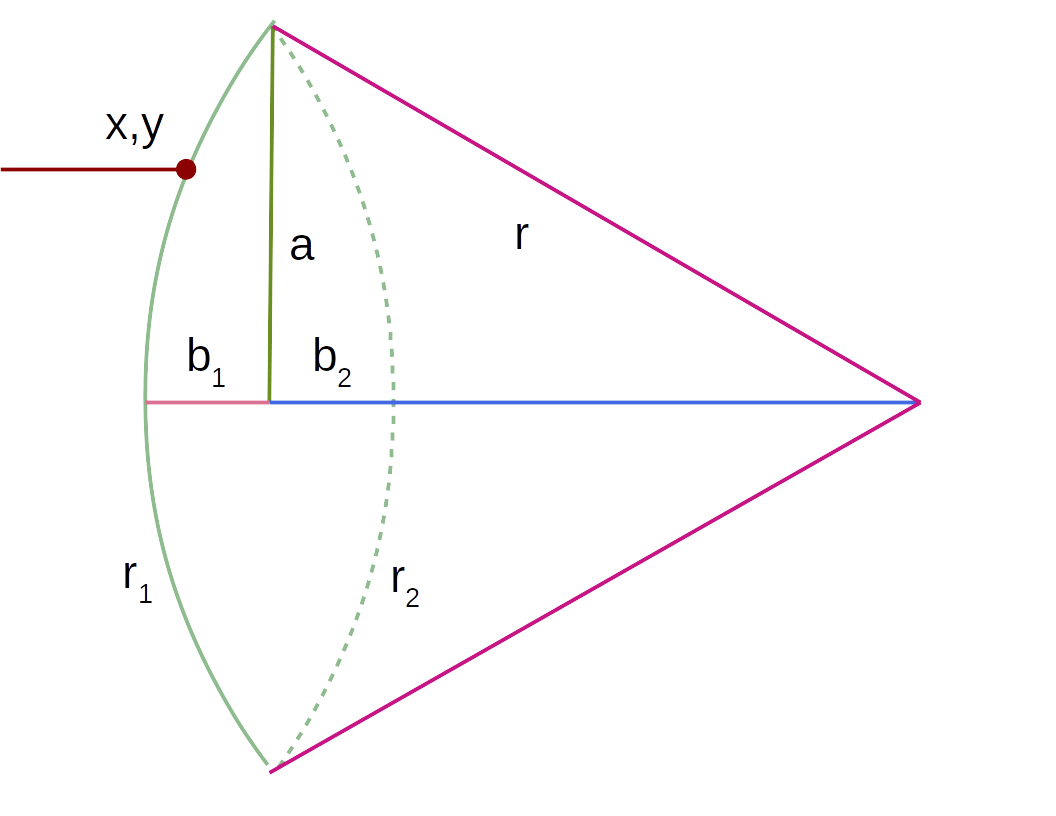
Figure 29: Lens schematic diagram
Remember about Figure 29 that only one side of the lens is fully diagrammed, and the two sides can have different properties, each of which must be evaluated separately.
Initially, and referring to Figure 29, in practice we have access to $a$ (major radius, distance from lens center to edge) and $b$ (minor radius, distance from lens center to one face), values easily acquired by measuring the lens itself. With these values, we can compute:
\begin{equation} r = \frac{a^{2} + b^{2}}{2 b} \end{equation}Lensmaker's Equation
It can be seen that $r$, the hypotenuse of the associated triangle, is the radius (center of curvature) of that side of the lens, and with two such radii (not necessarily the same), we can use the Lensmaker's Equation to compute the lens focal length:
\begin{equation} f = \frac{1}{\left(n - 1\right) \left(\frac{d \left(n - 1\right)}{n r_{1} r_{2}} - \frac{1}{r_{2}} + \frac{1}{r_{1}}\right)} \end{equation}Where:
- $f$ = lens focal length in consistent units.
- $n$ = lens material index of refraction (IOR).
- $d$ = $b_1+b_2$, or lens thickness at center.
- $r_1$,$r_2$ = the two lens radii, acquired from Equation (8).
It's important to say that the Lensmaker's Equation can only be an estimate, because (as we saw earlier) spherical lenses have different focal lengths at different locations within the diameter of the lens, and the shorter the focal length, the more serious this problem becomes.
Lens Profile and Intersection
In computer modeling of lenses and mirrors, we need to find points of intersection between light beams and optical surfaces. Here's an equation for the intersection of a light beam and one surface of a spherical lens:
\begin{equation} x = - \sqrt{- b^{2} + \frac{\left(a^{2} + b^{2}\right)^{2}}{4 a^{2}}} + \sqrt{- y^{2} + \frac{\left(a^{2} + b^{2}\right)^{2}}{4 a^{2}}} \end{equation}Where:
- $x$ = Horizontal coordinate of intersection between light beam and lens surface.
- $y$ = Light beam's vertical distance from lens center.
- $a$,$b$ = Lens dimensions (Figure 29).
Referring to Figure 29, notice the point of intersection at the upper left. The coordinate system's origin (meaning $x$ = $y$ = 0) is the lens center.
In a typical computer modeling algorithm, Equation (10) is used to locate a point of intersection between a light beam and a lens surface, then the angle between the light beam and the lens surface is computed, then Snell's Law is applied to compute the light beam's possible change of direction.
Hyperbolic Lenses and Other Complications
The above example models a spherical lens, a light beam, and an intersection where the light beam's direction of travel is perpendicular to the lens plane. It's a good introduction to the mathematics required to model optics in a computer, but a more complete system requires taking non-spherical lens surfaces and non-perpendicular light beams into account. My free, open-source application OpticalRayTracer includes some of these more complete models, and can be used to acquire an intuitive, hands-on sense of how lenses behave.
I hope this article encourages readers to explore Blender, and in particular my new Python lens generator mesh_generator.py, which works with Blender to create some superior virtual lenses with much less effort than the normal methods shown above.
And, aware that people don't read articles like this so much any more, I'm also planning some Blender instructional/expository videos for my YouTube channel, containing much the same content as shown above.
Thanks for visiting and thanks for reading!
| Home | | Computer Graphics | |  |  Share This Page Share This Page |